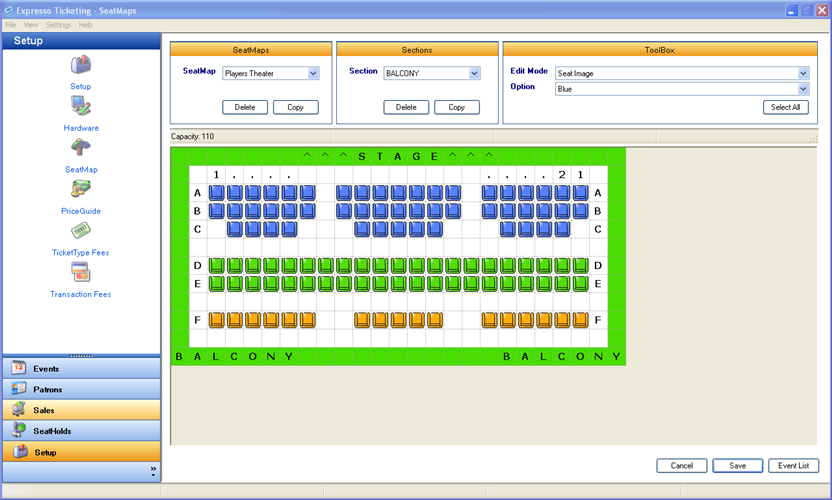
SeatMap
Definition:
A customized template containing the layout of your organizations facility.
Prerequisites: None
Main Screen > Setup > SeatMap
SeatMap Entry Screen:

SeatMaps
- SeatMap - contains a dropdown list of previously created SeatMaps and the option to add new ones.
-
Delete – deletes selected SeatMap.
***Note: deleting a SeatMap does not remove it from events that have already been created using this template.
- Copy – creates a copy of the selected SeatMap and Sections.
Sections
- Sections - contains a dropdown list of previously created Sections and the option to add new ones.
-
Delete – deletes selected Section.
***Note: deleting a Section does not remove it from events that have already been created with this template.
- Copy – creates a copy of the selected Section and adds it to the SeatMap.
Toolbox
- Edit Mode - contains a dropdown list of custom design features available when creating Sections.
-
Options - drop down list of features for selected Edit Mode.
- SeatImage - Blue, Green, Orange, Purple, Fuscia, Red, Black and Remove Seat.
- RowLabel – GA (General Admission), (1,2,3), (10,9,8), (A,B,C), (AA,BB,CC) and (Add RowLabel).
- SeatLabel - GA (General Admission), (1,2,3), (10,9,8), (2,4,6), (10,8,6), (101,102,103), (110,109,108) and (Add SeatLabel).
- Text - Right to Left, Left to Right, Top to Bottom, Bottom to Top and Remove Text.
- Color - Blue, Green, Orange, Purple, Fuscia, Red, Black and Remove Color.
- Select All – automatically applies selected Edit Mode and Option to all seats in the section.
Creating a SeatMap
- Select (add new SeatMap) from the SeatMaps dropdown box.
- Enter the name of the SeatMap.
- Select (add new Section) from the Sections dropdown box.
- Enter the name of the Section.
-
Select the dimensions of the section grid.
Note: It is recommended to make the grid larger than the actual number of rows and seats contained in the section. This will allow for adding aisles, descriptive text comments and additional seats to the SeatMap if necessary.
- Select (Seat Image) from the Edit Mode dropdown.
- Select the Seat Color from the Options dropdown.
- Click on the Section grid at a point where you would like to begin adding seats.
-
While holding the mouse button, highlight the area of the Section grid where
you would like Seats to be placed and release the mouse.
Note: Alternatively, you can click each individual cell to add a Seat image or choose the Select All button to populate the entire grid.
- Select (RowLabel) from the Edit Mode dropdown.
- Select the desired labeling sequence from the Options dropdown.
- Click on the beginning seat of the row where you would like to begin labeling the rows.
-
While holding the mouse button, highlight the last seat of the rows you would
like to label and release the mouse.
Note: Alternatively, you can click each individual cell to add a Row Label or choose the Select All button to select all rows.
-
At the prompt Enter the beginning Row Label and select Ok.
Note: Each Seat Image is required to have an assigned Row Label.
- Select (SeatLabel) from the Edit Mode dropdown.
- Select the desired labeling sequence from the Options dropdown.
- Click on the beginning seat of the row where you would like to begin labeling the rows.
-
While holding the mouse button, highlight the last seat you would like to label
and release the mouse.
Note: Alternatively, you can click each individual cell to add a Seat Label or choose the Select All button to select all Seats.
-
At the prompt Enter the beginning Seat Label and select Ok.
Note: Each Seat Image is required to have an assigned Seat Label.
- Select (Text) from the Edit Mode dropdown.
- Select the desired labeling direction from the Options dropdown.
- Click on the empty cell where you would like to begin adding text and release the mouse.
-
At the prompt enter the text you would like to insert and select Ok.
Note: Text can only be added to cells that do not contain a Seat Image. If the length of text exceeds the number of opens cells it will be truncated.
- Select (Color) from the Edit Mode dropdown.
- Select the desired Color from the Options dropdown.
-
Click on the empty cell where you would like to begin adding Color and release
the mouse.
Note: Color can only be added to cells that do not contain a Seat Image.
Once all Sections are created, select Save.If you need to add additional Section repeat steps 3-25.

